VulCode
Blog

Installing Pterodactyl step by step: the panel, Wings and the first server

You set up the Pterodactyl 1.15 panel on Ubuntu 24.04 with PHP 8.3, MariaDB, Redis and Nginx, then a Wings node on Docker that runs the game servers. Following the official documentation, in an order that needs no fixing afterwards.

VulCodeVulCode16 min read
Installing Pterodactyl step by step: the panel, Wings and the first server - VulCode
What you will buildBash, 10 steps
  1. PHP, MariaDB, RedisPanelPanel 1.15 behind Nginx with SSL.
  2. Queue and cronBackgroundpteroq and schedule:run every minute.
  3. WingsNodeA Docker daemon that runs the servers.
  4. The first serverResultAn allocation, an egg and a game server in the panel.

The guide at a glance

Pterodactyl is a game server management panel: a PHP panel where customers and admins manage servers, and Wings, a daemon on each node that runs the servers in Docker containers. After this guide you have the panel on your own domain with an SSL certificate, a first node, and you can create your first server.

Installing the Pterodactyl panel

Group
Servers and hosting
Level
advanced
Reading time
about 16 min
Code
Bash

Files: crontab, pteroq.service, pterodactyl.conf, wings.service; plus commands in the terminal.

Steps
10 steps

10 of them with code or commands to copy.

Check
GitHub API, releases of pterodactyl/panel and pterodactyl/wings

Latest releases: panel v1.15.1 and Wings v1.13.3; we did not install a panel

Documentation
4 official documents

Pterodactyl: Getting Started (panel); Pterodactyl: Webserver Configuration; Pterodactyl: Creating SSL Certificates; Pterodactyl: Installing Wings

From our code
WaveHost

wave-panel-backend/src/lib/pterodactyl.ts
Before you start

The order differs from the documentation in one place: we get the SSL certificate before replacing the Nginx configuration. The documentation warns that an SSL configuration without a certificate stops Nginx from starting, so this way nothing needs fixing along the way.

What you need
Installing the Pterodactyl panel
A server with Ubuntu 24.04 or Debian 12 or 13
The documentation supports Ubuntu 22.04 and 24.04, Debian 11, 12 and 13, and RHEL, Rocky and AlmaLinux 8 and 9. The commands here are for Ubuntu 24.04, where MariaDB installs without an extra repository.
KVM virtualisation or a dedicated server for the node
Wings needs Docker. On OpenVZ, Virtuozzo and LXC it most likely will not work unless the provider enabled nested virtualisation. KVM always works.
A domain and a DNS record
panel.yourdomain.com must point to the server before you request a certificate. When the panel uses SSL, the Wings node needs a certificate for its own domain too.
Root access
The install assumes root or sudo. In the end the panel runs as www-data and Wings as root, because it manages Docker.

Panel requirements

ComponentVersionNotes
PHP8.2 lub 8.38.3 recommended; extensions cli, openssl, gd, mysql, PDO, mbstring, tokenizer, bcmath, xml, curl, zip, fpm
DatabaseMySQL 5.7.22+ / MariaDB 10.2+MySQL 8 recommended
Redisredis-servercache and queue
Composerv2installs the PHP dependencies

Step by step

10 steps with commands and files to copy. The contents beside them show where you are.

Install the dependencies

On Ubuntu 24.04 PHP 8.3 is in the system repository; the extra ondrej/php repository is needed only on 22.04. You install Redis from the official Redis repository and Composer with the installer from getcomposer.org.

bashbash, 11 lines
# Ubuntu 24.04apt -y install software-properties-common curl apt-transport-https ca-certificates gnupg # Oficjalne repozytorium Rediscurl -fsSL https://packages.redis.io/gpg | sudo gpg --dearmor -o /usr/share/keyrings/redis-archive-keyring.gpgecho "deb [signed-by=/usr/share/keyrings/redis-archive-keyring.gpg] https://packages.redis.io/deb $(lsb_release -cs) main" | sudo tee /etc/apt/sources.list.d/redis.list apt updateapt -y install php8.3 php8.3-{common,cli,gd,mysql,mbstring,bcmath,xml,fpm,curl,zip} mariadb-server nginx tar unzip git redis-server curl -sS https://getcomposer.org/installer | sudo php -- --install-dir=/usr/local/bin --filename=composer

Download the panel files

You download the panel as a ready archive from the latest GitHub release. The storage and bootstrap/cache directories must be writable because the panel keeps files and cache there.

bashbash, 5 lines
mkdir -p /var/www/pterodactylcd /var/www/pterodactylcurl -Lo panel.tar.gz https://github.com/pterodactyl/panel/releases/latest/download/panel.tar.gztar -xzvf panel.tar.gzchmod -R 755 storage/* bootstrap/cache/

Create the database and user

The database user connects from 127.0.0.1, not localhost: in MariaDB those are two different accounts. Change the password to your own unique one.

mariadbsql, 6 lines
mariadb -u root -p CREATE USER 'pterodactyl'@'127.0.0.1' IDENTIFIED BY 'unikalne-silne-haslo';CREATE DATABASE panel;GRANT ALL PRIVILEGES ON panel.* TO 'pterodactyl'@'127.0.0.1' WITH GRANT OPTION;exit

Install the panel and store the key

key:generate creates APP_KEY, which the panel uses to encrypt sensitive data such as API keys. Run it only on the first install. Copy the key to a password manager or an encrypted file off the server: without it the encrypted data cannot be recovered even from a database backup.

bashbash, 6 lines
cp .env.example .envCOMPOSER_ALLOW_SUPERUSER=1 composer install --no-dev --optimize-autoloaderphp artisan key:generate --force # Zapisz klucz poza serwerem: bez niego zaszyfrowanych danych nie odzyskaszgrep APP_KEY /var/www/pterodactyl/.env

Configure the environment, database and first admin

The three p:environment commands ask for the panel URL, cache, sessions, database credentials and mail server. migrate --seed creates the tables and adds the default nests and eggs: do not interrupt it. p:user:make creates the admin account.

bashbash, 8 lines
php artisan p:environment:setupphp artisan p:environment:databasephp artisan p:environment:mail     # smtp dla własnego serwera poczty php artisan migrate --seed --forcephp artisan p:user:make            # hasło: 8 znaków, wielkie i małe litery, cyfra chown -R www-data:www-data /var/www/pterodactyl/*

Start the queue and cron

Cron runs the panel's jobs every minute, such as session cleanup and scheduled server tasks. The pteroq service processes the queue: emails and other background jobs. On RHEL, Rocky and AlmaLinux replace redis-server.service with redis.service in the After line.

crontab, pteroq.serviceini, 19 lines
# sudo crontab -e* * * * * php /var/www/pterodactyl/artisan schedule:run >> /dev/null 2>&1 # /etc/systemd/system/pteroq.service[Unit]Description=Pterodactyl Queue WorkerAfter=redis-server.service [Service]User=www-dataGroup=www-dataRestart=alwaysExecStart=/usr/bin/php /var/www/pterodactyl/artisan queue:work --queue=high,standard,low --sleep=3 --tries=3StartLimitInterval=180StartLimitBurst=30RestartSec=5s [Install]WantedBy=multi-user.target
bash
sudo systemctl enable --now redis-serversudo systemctl enable --now pteroq.service

Get the SSL certificate before changing Nginx

Certbot with the Nginx plugin issues the certificate while the default Nginx configuration is running and port 80 is open. Only then do you swap in the SSL configuration, which finds the certificate files straight away.

bashbash, 5 lines
sudo apt install -y certbot python3-certbot-nginxcertbot certonly --nginx -d panel.twojadomena.pl # odnawianie codziennie o 23:00, z restartem nginx po udanym odnowieniu0 23 * * * certbot renew --quiet --deploy-hook "systemctl restart nginx"

Configure Nginx

The configuration redirects HTTP to HTTPS, passes PHP requests to the php8.3-fpm socket and allows uploads up to 100 MB. The socket path must match the PHP version you installed.

/etc/nginx/sites-available/pterodactyl.confnginx, 46 lines
server {    listen 80;    server_name panel.twojadomena.pl;    return 301 https://$server_name$request_uri;} server {    listen 443 ssl http2;    server_name panel.twojadomena.pl;     root /var/www/pterodactyl/public;    index index.php;     client_max_body_size 100m;    client_body_timeout 120s;    sendfile off;     ssl_certificate /etc/letsencrypt/live/panel.twojadomena.pl/fullchain.pem;    ssl_certificate_key /etc/letsencrypt/live/panel.twojadomena.pl/privkey.pem;    ssl_session_cache shared:SSL:10m;    ssl_protocols TLSv1.2 TLSv1.3;     location / {        try_files $uri $uri/ /index.php?$query_string;    }     location ~ \.php$ {        fastcgi_split_path_info ^(.+\.php)(/.+)$;        fastcgi_pass unix:/run/php/php8.3-fpm.sock;        fastcgi_index index.php;        include fastcgi_params;        fastcgi_param PHP_VALUE "upload_max_filesize = 100M \n post_max_size=100M";        fastcgi_param SCRIPT_FILENAME $document_root$fastcgi_script_name;        fastcgi_param HTTP_PROXY "";        fastcgi_intercept_errors off;        fastcgi_buffer_size 16k;        fastcgi_buffers 4 16k;        fastcgi_connect_timeout 300;        fastcgi_send_timeout 300;        fastcgi_read_timeout 300;    }     location ~ /\.ht {        deny all;    }}
bash
rm /etc/nginx/sites-enabled/default# zapisz konfigurację jako /etc/nginx/sites-available/pterodactyl.confsudo ln -s /etc/nginx/sites-available/pterodactyl.conf /etc/nginx/sites-enabled/pterodactyl.confsudo systemctl restart nginx

Install Docker and Wings on the node

First check the virtualisation: systemd-detect-virt must not show openvz or lxc. You install Docker with the get.docker.com script, and Wings is a single executable from the latest release. If the kernel ends in -grs-ipv6-64 or -mod-std-ipv6-64, ask the provider for the distribution's standard kernel.

bashbash, 8 lines
systemd-detect-virt        # kvm albo none: Docker zadziała; openvz albo lxc: najpewniej nie curl -sSL https://get.docker.com/ | CHANNEL=stable bashsudo systemctl enable --now docker sudo mkdir -p /etc/pterodactylcurl -L -o /usr/local/bin/wings "https://github.com/pterodactyl/wings/releases/latest/download/wings_linux_$([[ "$(uname -m)" == "x86_64" ]] && echo "amd64" || echo "arm64")"sudo chmod u+x /usr/local/bin/wings

Add the node in the panel and start Wings

In the admin panel choose Nodes and Create New. Once the node exists, its Configuration tab shows a ready config.yml: paste it into /etc/pterodactyl, or use Generate Token, which gives you a command to paste into the terminal. The first wings --debug run shows any errors; then you start the service.

An allocation is an IP address and port pair you assign to a server. Every server needs at least one. Behind NAT you give the internal address.

/etc/systemd/system/wings.serviceini, 20 lines
# /etc/systemd/system/wings.service[Unit]Description=Pterodactyl Wings DaemonAfter=docker.serviceRequires=docker.servicePartOf=docker.service [Service]User=rootWorkingDirectory=/etc/pterodactylLimitNOFILE=4096PIDFile=/var/run/wings/daemon.pidExecStart=/usr/local/bin/wingsRestart=on-failureStartLimitInterval=180StartLimitBurst=30RestartSec=5s [Install]WantedBy=multi-user.target
bash
# config.yml z zakładki Configuration węzła w panelu wklej do /etc/pterodactyl/config.ymlsudo wings --debug          # pierwszy start na pierwszym planie; Ctrl+C, gdy działa bez błędówsudo systemctl enable --now wingshostname -I | awk '{print $1}'   # adres IP do alokacji

Check that it works

We did not install a panel for this guide. On 6 October 2026 we compared the commands with the Pterodactyl v1 documentation and checked the latest releases in the GitHub API: panel v1.15.1 and Wings v1.13.3, both from 14 August 2026. The curl commands with latest/download fetch exactly these versions.

terminal6 October 2026GitHub API, releases of pterodactyl/panel and pterodactyl/wings
$ curl -s https://api.github.com/repos/pterodactyl/panel/releases/latest
v1.15.1 2026-08-14 panel.tar.gz
$ curl -s https://api.github.com/repos/pterodactyl/wings/releases/latest
v1.13.3 2026-08-14 wings_linux_amd64, wings_linux_arm64
Latest releases: panel v1.15.1 and Wings v1.13.3; we did not install a panel
What the output lines mean
  1. lines 1-2Panel v1.15.1

    The latest panel release, 14 August 2026. The curl command with latest/download in step 2 fetches exactly this panel.tar.gz.

  2. lines 3-4Wings v1.13.3

    The Wings release of the same day, with files for amd64 and arm64.

  3. lines 1-4What this checks

    Versions, not an installation: we compared the commands with the version 1 Pterodactyl documentation.

How you know it works on your side

  • https://panel.yourdomain.com shows the login page with a valid certificate.
  • systemctl status pteroq and wings shows active (running).
  • The node in the panel has a green heart, so the panel reaches Wings.
  • A new server from a default egg installs and starts.

The errors you will meet

The same path as "What you will build" at the top of the page, with the places where the work stops most often. For each error: the symptom, the cause and what to do.

Where it stops and why

PHP, MariaDB, Redis

Panel

Panel 1.15 behind Nginx with SSL.

  • Stops here: 502 Bad Gateway on the panel page

    fastcgi_pass points to another PHP version's socket, or php-fpm is not running. What to do: Check ls /run/php/ and fix the path in pterodactyl.conf.

  • Stops here: Nginx will not start after the config change

    The SSL configuration points to a certificate that does not exist yet. What to do: Run certbot certonly first, then the SSL configuration.

Queue and cron

Background

pteroq and schedule:run every minute.

  • Stops here: The panel sends no emails

    pteroq is not running, or its After line names a Redis service that does not exist. What to do: systemctl status pteroq; on RHEL use redis.service, without Redis remove the After line.

Wings

Node

A Docker daemon that runs the servers.

  • Stops here: The node has a red heart in the panel

    Wings is not running, or an SSL panel talks to Wings without a certificate for its domain. What to do: Run wings --debug and get a certificate for the node's domain.

  • Stops here: Docker does not work on the node

    OpenVZ or LXC virtualisation, or a modified provider kernel. What to do: Use KVM or a dedicated server with a standard kernel.

The first server

Result

An allocation, an egg and a game server in the panel.

    How we do it in our own code

    The same topic in code we maintain: WaveHost.

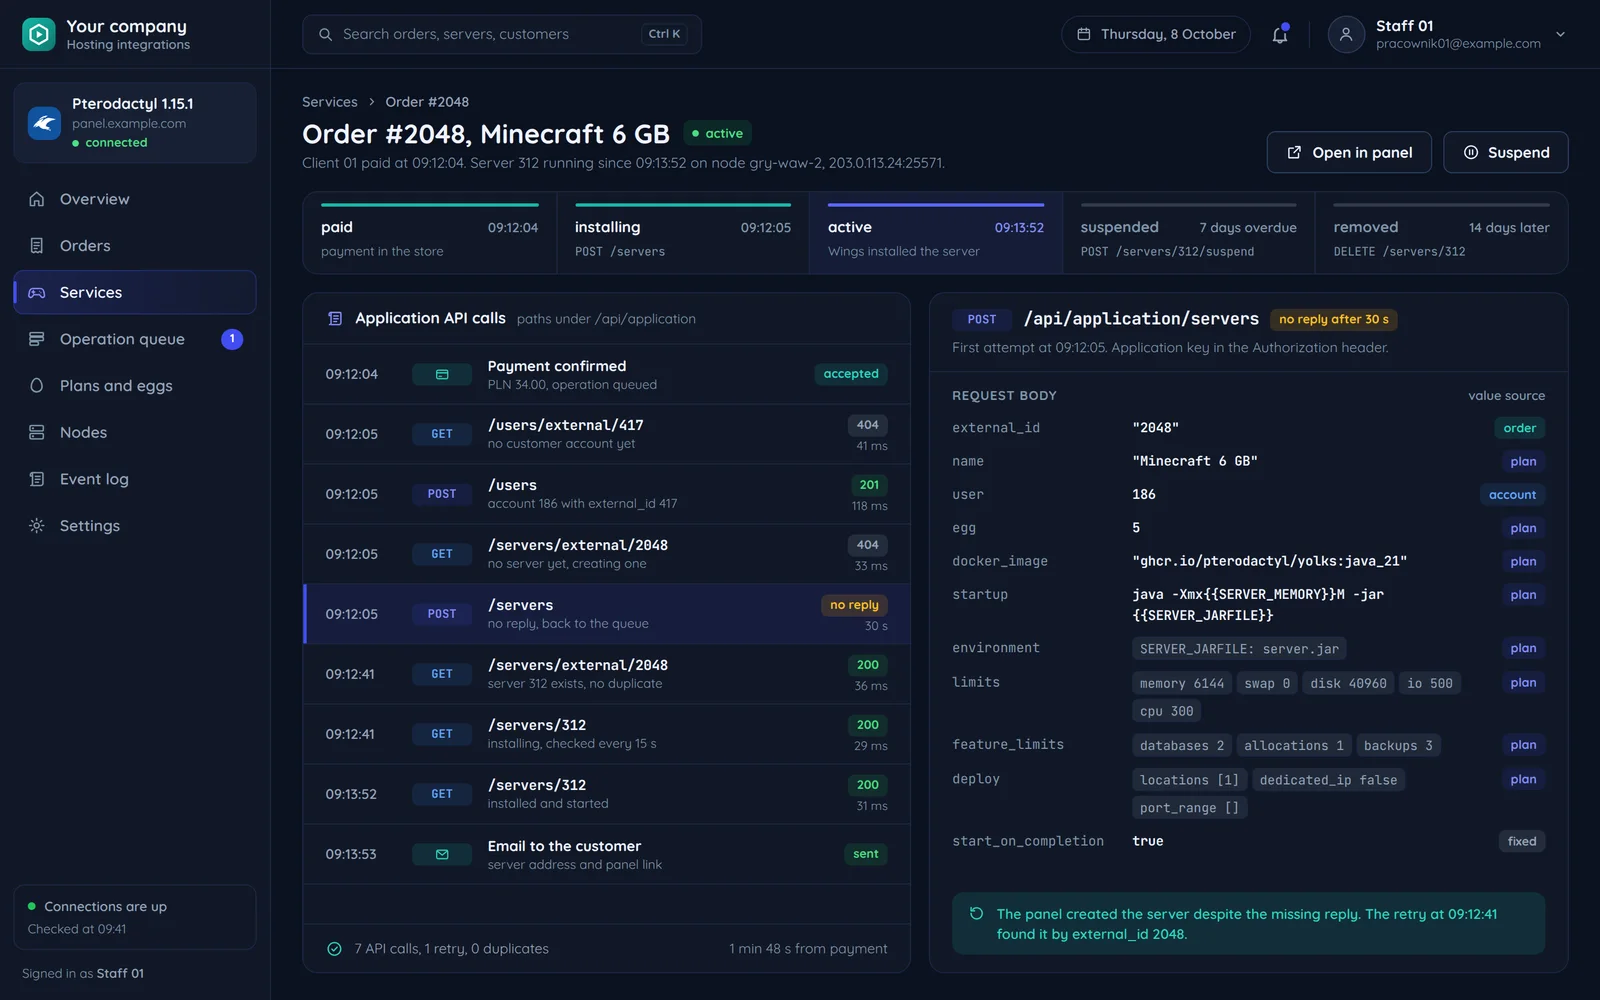
    A game server order with the calls to the Pterodactyl Application API

    Pterodactyl servers in the WaveHost panel

    In the WaveHost client panel, buying a game server creates a server in Pterodactyl through the Application API, with a ptla_ key. The customer never fills in a Pterodactyl form: the panel takes the Docker image, start command and default variables from the egg, applies the limits of the purchased package and assigns an allocation.

    Runtime operations, power, console and live resources, go through the Client API with an admin ptlc_ key, because the Application API does not expose them. A WaveHost panel user has one Pterodactyl account stored on their record, so further purchases land with the same user.

    wave-panel-backend/src/lib/pterodactyl.tsts, 32 lines
    export async function createPteroServer(input: {  name: string;  pteroUserId: number;  nest: number;  egg: number;  environmentOverrides?: Record<string, string>;  limits: { memoryMb: number; diskMb: number; cpuPercent: number };  allocationId: number;  startOnCompletion?: boolean;}) {  const eggInfo = await getEggInfo(input.nest, input.egg);  const res = await app().post(`/api/application/servers`, {    name: input.name,    user: input.pteroUserId,    egg: input.egg,    docker_image: eggInfo.dockerImage,    startup: eggInfo.startup,    environment: { ...eggInfo.environment, ...input.environmentOverrides },    limits: {      memory: input.limits.memoryMb,      swap: 0,      disk: input.limits.diskMb,      io: 500,      cpu: input.limits.cpuPercent,    },    feature_limits: { databases: 0, backups: 0, allocations: 1 },    allocation: { default: input.allocationId },    start_on_completion: input.startOnCompletion ?? true,  });  const attrs = res.data.attributes;  return { id: attrs.id as number, uuid: attrs.uuid as string, identifier: attrs.identifier as string };}

    Server creation in the WaveHost panel.

    Related pages and sources

    The service, tools and terms this guide leads to, and more guides.

    Official documentation

    Rather have it done by someone who has done it before?

    Describe your system. We reply within an hour with an integration plan and a quote.

    Questions